Alon Chou's Death Blow

Alon Chou's, Taipei, Taiwan, Death Blow is a prime example of what can be achieved with Photoshop. It depicts a dramatic battle between Optimus Prime, leader of the Autobots, and Megatron, leader of the Decepticons (click image for a larger view).


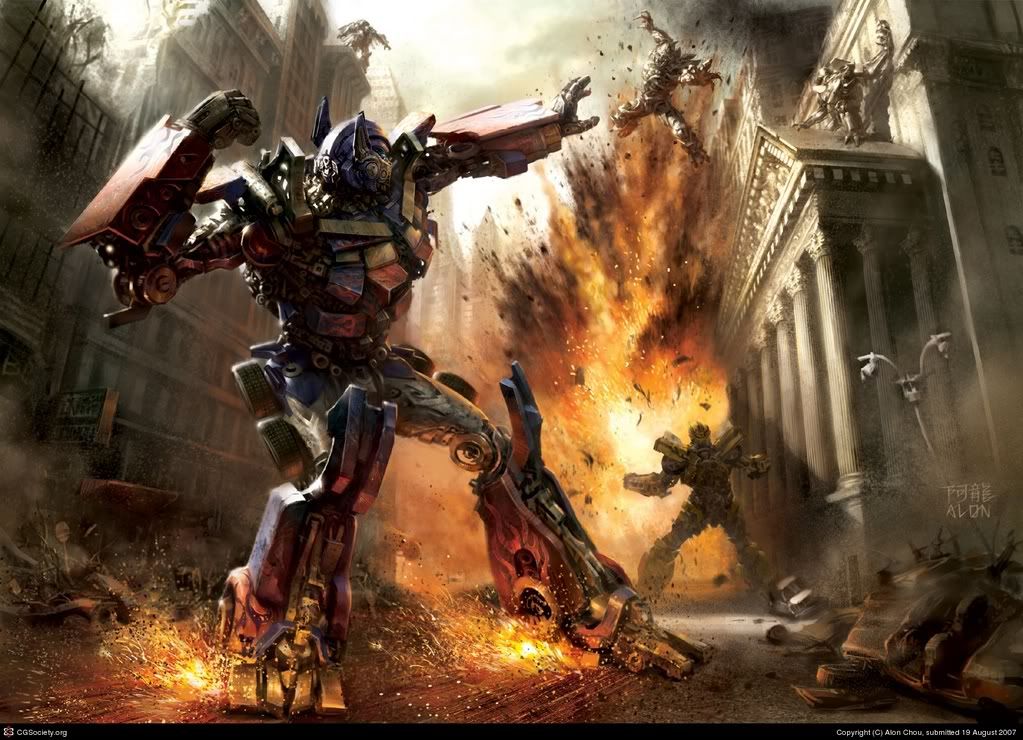
Optimus Prime is skidding forward ready to deliver the final blow as Megatron is coming down from an explosion.

The image leads you perfectly towards the focal point. No matter where the eye enters the image it will always lead to Optimus Prime's fist getting ready to swing. The composition is truly well done.

His environment is very dynamic and full of dramatic lighting which dramatizes the image even more.


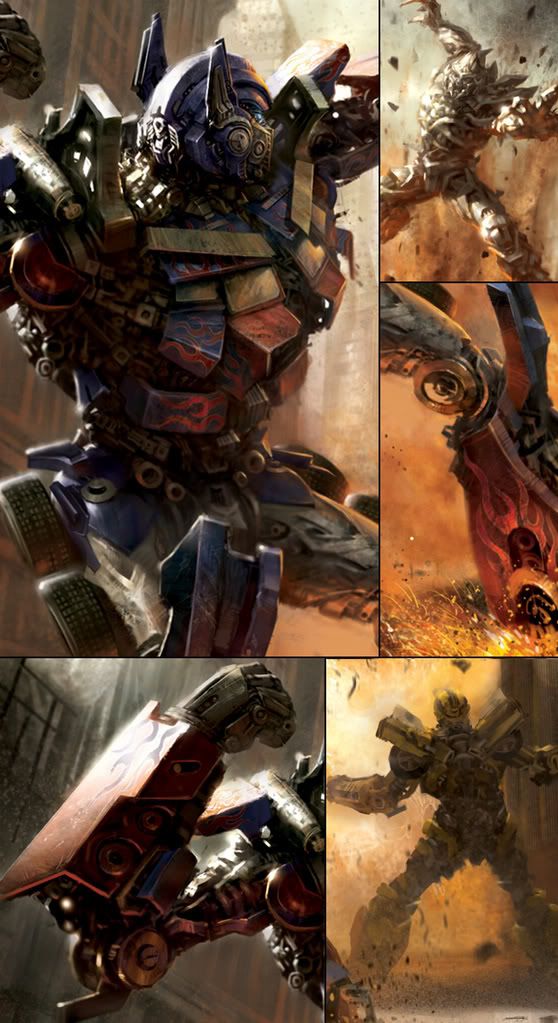
To the right you can see some detail shots of the art work. The first top left panel show the detail that was put into Optimus Prime. The panel next to that (top Right) show Megatron erupting from the explosion. Right below that he show the carful details in the sparks that are coming from Optimus Prime as he skids forward.

The bottom left Panel show some of the dramatic lighting on Optimus' arm. You can also see right next to that another Autobot very close to the explosion looking up as Megatron is coming down.


Overall Alon delivers stunning work and I highly recommend that you check out the rest of his portfolio over at CG Society. You will not be disappointed.

Emre Husmen Photoshop Rendering Tutorial

Emre Husmen has incredible vehicular designs. He currently resides in Toronto, Canada and is 22 years old. A lot can be learn from his rendering techniques using Photoshop CS3. Check out more or Emre's work over at his DeviantArt Gallery. Enjoy his tutorial on rendering a Mercedes-Benz LC concept.


First of all, open your sketch on Adobe Photoshop and make it 2000 pixels wide. I usually work in high resolutions, because it allows me to create high quality renderings.


Open a new layer on your sketch and fill it with white colour. Make it's opacity about 85%.


Let's start with selecting the body shape. I always use Pen Tool for that. Select the shape, open a new layer, fill it with grey tone. And try to keep your paths for future usage.


Select window shapes, open a new layer and fill it with black.


Do the same thing for front grills.


Make wheel ellipses above the body layer and put shadow under all of them.


Select the headlights and chrome parts (separate layers). Fill them with white.


Select the basic body parts and fill them with darker or lighter grey depending on where are they facing.

Create more body details with the same grey tones.


Now, start using the Dodge and Burn Tools! Use 200-300 px "airbrush" with 20-40% exposure. Darken the lower parts and lighten the upper parts. Also select a part on the windows for shining; open a new layer above the window layer and use a white airbrush to fill it a little bit (do not fill it all). Darken the headlight.

Find some nice rims from reference pictures (or you can create your own). Cut and paste it above the body layer and play with its colour and contrast. Select an ellipse on headlight layer and fill it with white. Give it some outer glow effect. Colourize the windows from Hue/Saturation menu (press CTRL + U).

Make a simple background with black and white gradients.

Decide where the light will come from. Duplicate your rims two times, each, use the ellipse layers under the rims and create your tires with using Dodge and Burn Tools.

Colorize the body with a matt tones (use the Hue/Saturation menu).

Put more details on your design. And now it's time to give some shining to your car. Open a new layer on the body layers; select & airbrush it with white. Complete everything except your final body color. Merge layers from the lowest body layer to the top. Keep the shadow and background layers separate.

Duplicate the "merged layers" two times. Colorize them with blue and yellow tones (separately). Now, you have to use airbrush eraser to remove the mixed parts of those colors. Use the "overlay" effect (under the layer effects menu) for both of them. Put some white dots on the edges to make the shining more realistic (on another layer). Lastly give some reflections to the car and the background with layer effects menu.

Nico Di Mattia: Speed Painting

Everyone seemed to really enjoy the speed paintings of Nico Di Mattia so here's a bit more from him.

A lot can be learned through the speed paintings of Nico Di Mattia. He is able to use Photoshop in a way that allows him to mimic traditional techniques and work efficiently. By recording as he paints the viewers (you) are able to see every step that he takes to get to his final product.

To Nico "A speed painting is an experience that includes the fusion of many areas: the drawing, the painting, the cinema, the music, and the digital technologies. Its principal objective is to try to entertain the spectator, taking him to an original world, where he could enjoy the genesis and the process of creation of an artistic piece."

Below are a few videos for you to enjoy of him rendering out Iron Man and Spiderman.


Iron Man
Time of working: 6 hours.
Number of Photoshop layers: 14
Music from Black Sabbath and Stratovariu


SPIDERMAN
Time of working: 5 hours.
Number of Photoshop layers: 15
Music from “Spider Man” OST by Danny Elfman

You can check out more from Nico Di Mattia and his Photoshop Speed Paintings through his website at speed-painting.com.ar

Digital Art Style' D.A.S Ezine Issue #1 is Out

That's right Digital Art Style dot com's first issue of D.A.S Ezine is out and ready for download. i think you are going to be in for a nice treat. We have some awesome art in there waiting for you guy to glue your eyes to.

The way this Ezine works is makes it very convenient for you to view. All you do is download the Ezine and save it to your computer. Then you run just like any other program you would run, and right there the Zine pops up on your desktop for your viewing pleasure. You can flip the pages just like in a real magazine and also type in a page number for a certain page that you may want to skip to. It also has navigation buttons that help get to certain places quicker such as the table of contents and also contain a button to send us back your feedback so that we can inprove future issues. More so it has a button to send the Zine to some friends that you know share a common interest with you.

ok, ok enough talk lets get to the download.


Click here or on the image to download

Go check it out. O and a quick tip if you want to magnify any image or text to see it better or more up close all you have to do is right-click and a magnify window will come up.

Digital Art Style EZine Issue 01

Digital Art Style EZine

Progress is looking good for the Digital Art Style EZine. The Zine is in a nice format that is optimized for easy viewing. You will be able to download the magazine and flip through the pages right from you desktop as if it was a traditional magazine. There is also some nice features in there for you guys to check out.

As soon as the first issue is released you can submit your comments, opinions, and suggestions. The first issue is planned to launch this week so check back or simply subscribe to D.A.S. and get an email notification the day it launches.


Share The Art

Share the art is where you get a change to have your art shown or featured in the D.A.S. Zine. I've added a form to the left under "Share The Art" for those who want to submit there work

Don't miss out on this. Your work could show up in future issues of D.A.S.

Who is Digital Art style for?

Digital Art Style is for everyone. Whether you are a beginner interested in the amazing world of digital art, and trust me it is amazing, or if you have already begun getting your hands dirty and want to broaden you knowledge on other forms of art. It doesn't matter if you know the difference between the clone tool and healing tool in Photoshop or that 300 dpi really mean that there are 300 dots of ink per inch of print.

Alot of the content is written so that anyone can be able sit, read, and pick up information easily. Many people don't even have a clue what Matte Painting is and it's importance to the digital art industry. We will be expanding our selection of choices to choose from, trust me there is much more to come.

Don't be discouraged if you think digital art is too much. Things take time, nothing is mastered in a day. It's not about creating photo perfect images, it's about expressing yourself, your emotions, your thoughts and feelings through art. In the beginning worry about nailing down the basics and then go and tackle more advanced techniques. We will have a very nice selection of tutorials in the Tutorials section .

Creating art can be a time consuming process but usually results as the more time put into a project the better it turns out. You also have to keep in mind that too much time can also hurt your project. Set a goal and know when to stop.

Take a look at Nico Di Mattia's speed painting below to get a glimpse of what alot of practice and hard work can do. Below is his whole 19 hour process sped up for your learning experience.


BUMBLEBEE
Time of working: 19 hours.
Number of Photoshop layers: 16
Music from Kill Bill OST and Transformers Movie Score

With that said keep an open mind and don't be discouraged, you'll never know what masterpiece will emerge if you never try.

"Never let the fear of striking out keep you from playing tha game." -Babe Ruth


-JPerez

Welcome to Digital Art Style!

I'd like to take the time to welcome everyone to the official Digital Art Style Blog. This blog works in direct conjunction with Digitalartstyle.com All updates will be posted in this section.


As of now the site is still under construction but that doesn't mean that it doesn't have any content to view. Make sure to stop by and check out whats there. There are a few good tutorials that are up as of now and there plenty more to come. Also the 3D art section is almost finish and the front page to the other sections are up and running.

Don't forget to sign up for the D.A.S. Ezine. You can sign up for it using the form to the left under Ezine or on any of the pages on the site. This isn't your typical Ezine so sign up and check it out.

We are also going to be working on many ways to keep you guys involved. You guys will be able to submit your own art and every week we will have a new featured piece up. There is also another featured spot in the Ezine section "Piece of the Month." This will be coming soon. We are also open to suggestions so if you have any cool ideas that you want to share go right.

We are slowly but surely getting everything up for u guys. So make sure you check back often.

-JPerez


top